You don't need a large garage or a big budget to get started in woodworking. Some of the most skilled craftspeople have worked from a single workbench in a corner of a spare bedroom, or from a small folding table in a shared garage. What you need is a clear, flat work surface, basic lighting, a few well chosen tools, and the knowledge to make the most of whatever space you have. This guide covers all of it.
Reader Note: This article contains affiliate links. If you choose to purchase through one, we may earn a small commission at no extra cost to you. We only recommend products we genuinely stand behind. Full disclosure here.
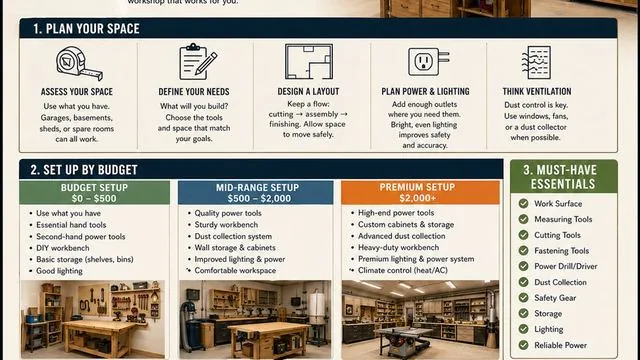
Choosing Your Workshop Space
Almost any enclosed space works as a starter workshop: a garage, a garden shed (properly insulated and ventilated), a basement, or even a spare room for hand tool only work. The minimum requirements are: a flat floor where you can move safely around a workbench, access to power (a single 13 amp socket is enough to start), adequate lighting (one bright overhead light plus a secondary workbench lamp), and ventilation (a door that opens, or a window, for dust and finish fumes).
💧 Climate Tip: Avoid spaces with damp issues, wood absorbs moisture, and your projects will move and distort in a humid workshop. A $10 hygrometer will tell you your humidity level. Aim for 40,60% relative humidity.
🔨 Workshop Projects to Build First
A workbench and tool storage are the two highest priority workshop builds. Ted's Woodworking includes plans for dozens of workbench styles and workshop storage solutions.
Browse Workshop Plans →Build Your Workbench Before Buying Anything Else
A workbench is the most important workshop investment you can make, and the best beginner workbench is one you build yourself. A simple workbench from construction lumber (2×4 and 2×6 framing timber) costs $80,$150 in materials and provides a massive, heavy, stable work surface. Build it 900mm high (or your knuckle height when standing), at least 600mm deep and 1500mm long. Include a front vise, a simple wooden screw vise costs under $30 in hardware.
A heavy workbench doesn't slide when you plane or chisel. Weight is a feature. Bolt it to the wall if possible, or load the lower shelf with your heaviest tools.
The Three Budget Building Strategies
Strategy 1: Buy quality used tools. A well maintained 20 year old hand plane from a car boot sale outperforms a cheap new one. Chisels, squares, clamps, and hand saws all age gracefully. Strategy 2: Build your own storage. Tool cabinets, wall mounted holders, and lumber racks are all excellent first workshop projects, they use off cuts and teach the skills you need for future builds. Strategy 3: Prioritise versatility. A good cordless drill/driver does the work of a dedicated driver and a drill combined. A Japanese pull saw replaces both a crosscut and a tenon saw. Buy tools that do more than one thing.
💰 Value Tip: The three tools that give beginners the most capability per pound spent: a good combination square ($30,$50), a quality cordless drill/driver ($80,$120 for a good brand), and a set of four chisels ($40,$80). Everything else can wait.
Lighting, Dust Management, and Safety
Workshop lighting should be bright and shadow free. A single 60W incandescent bulb is not enough, add LED shop lights or angle poise lamps positioned to eliminate shadows at your workbench. Poor lighting causes measurement errors and increases the risk of tool slips.
Dust management doesn't require an expensive dust extractor at the start. A decent dust mask (FFP2/P2 rating minimum), regular sweeping, and keeping the floor clear are the priority. Add a small shop vac ($40,$80) as your first power tool upgrade, it dramatically reduces airborne dust and keeps the floor safe.
🏗️ Plans for Your First Workshop Builds
Build your workbench, tool storage, and lumber rack from plans, the best way to set up your workshop while practising the skills you'll use for every future project.
Get Workshop Plans →