A garden shed is one of the most rewarding DIY projects you can take on. It's large enough to feel like a real achievement, practical enough to use every day, and teaches construction skills that transfer to house maintenance, extensions, and furniture building. This step by step guide assumes no previous construction experience and walks you through every stage, from choosing your site to hanging the final door.
Reader Note: This article contains affiliate links. If you choose to purchase through one, we may earn a small commission at no extra cost to you. We only recommend products we genuinely stand behind. Full disclosure here.
Step 1: Planning and Permissions
Before a single board is cut, check your local planning rules. In the UK, most garden sheds under 2.5m eaves height qualify as permitted development and need no planning permission, but there are conditions around proximity to property boundaries and listed buildings. In Ireland, a shed up to 25m² within the property curtilage is generally exempt development. Check with your local authority's planning department, a 20 minute call now prevents major problems later.
Sketch your shed on paper: width, depth, height, door position, and window positions. Standard small shed sizes (8×6, 10×8, 12×10 feet) are the easiest to plan because standard lumber dimensions minimise cutting waste. Decide your roofline, gable (triangular ends), pent (single slope), or lean to, before you begin. Each has different framing requirements.
🧭 Orientation Tip: If your shed is for workshop use, orientate any windows to face north or east. North facing windows give consistent, glare free light. East facing windows provide morning light without afternoon sun that can fade finishes and overheat the space.
📐 Get Professionally Designed Shed Plans
Our recommended plan library includes over 12,000 shed designs, from compact 6×4 tool stores to large 16×20 workshop buildings, with complete material lists and permit size guidance.
Browse Shed Plans →Step 2: Site Preparation and Foundation
Clear the site completely: remove vegetation, level the ground (within 25mm is sufficient for most shed foundations), and mark out the footprint using pegs and string. For a timber foundation (the recommended choice for most sheds), excavate 100mm across the entire footprint and fill with compacted MOT Type 1 gravel. This creates a free draining base that prevents the frost heaving and moisture problems that destroy shed foundations.
Set concrete deck blocks (or treated timber skids for a simpler option) on the gravel, spacing them no more than 1.2m apart. Level each block carefully with a spirit level, this is the most important precision step in the entire build. A level foundation means every wall plumb and every corner square without any additional compensation later.
Step 3: Build the Floor Frame
Cut pressure treated 2×6 (or 47×150mm) timber to form the floor frame: outer rim joists forming the rectangle, inner joists at 400mm centres. Fasten at corners with structural screws and metal joist hangers at interior positions. Check for square by measuring both diagonals, they must be equal. A 1,2mm difference is acceptable; anything more requires adjustment before proceeding.
Sheath the floor frame with 18mm or 22mm exterior grade plywood (T&G flooring grade is ideal). Stagger joints so no two adjacent sheets share an end joint. Screw every 200mm around the perimeter and 300mm along interior joists. This floor will support everything above it, including heavy equipment if this is a workshop shed.
Step 4: Frame and Raise the Walls
Build each wall flat on the floor: mark stud positions on both plates simultaneously (called 'gang marking') to ensure they align. Standard wall framing uses 47×100mm (2×4) timber studs at 400,600mm centres. Cut openings for doors and windows with appropriate headers, a doubled 47×100mm header handles most spans under 900mm.
Raise walls in order: back wall first, then side walls, then front. Brace each wall with temporary diagonal bracing before raising the next. Tie wall plates together at corners with metal ties or by overlapping the top plate. Check every wall for plumb before fixing permanently, a wall that's 5mm out of plumb causes significant problems at the roof stage.
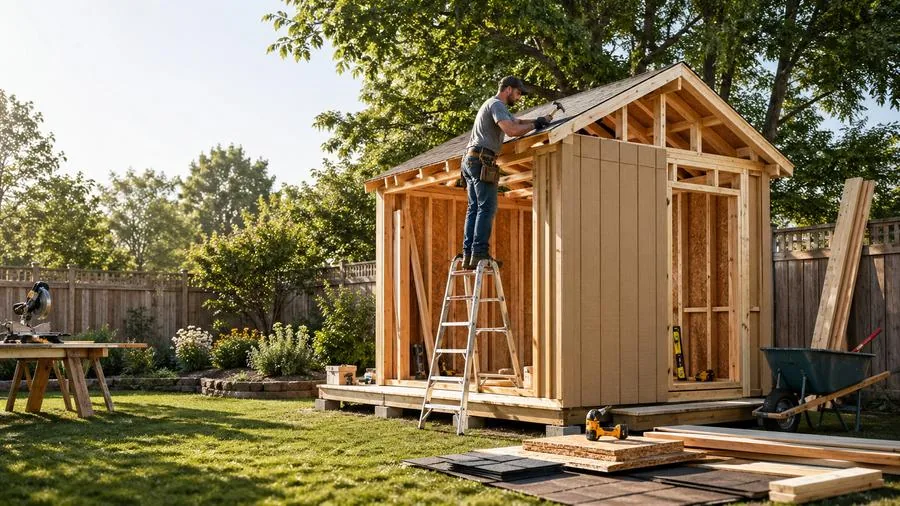
Step 5: Roof Framing
For a simple gable roof, calculate rafter length using the Pythagorean theorem: √(run² + rise²) + eave overhang = rafter length. A 4:12 pitch (rises 4 inches for every 12 horizontal) is the minimum for effective water shedding in Irish and UK climates. Make a template rafter, test it for fit at the ridge and wall plate, then use it to mark and cut all subsequent rafters identically.
🏗️ Framing Tip: The bird's mouth notch, where the rafter seats on the wall plate, must be cut accurately. Too shallow and the rafter rocks; too deep and it weakens the rafter. The seat cut should be exactly the width of the wall plate (typically 100mm), and the plumb cut should be vertical.
Steps 6,8: Sheathing, Roofing, and Cladding
Sheathe the roof frame with 9mm or 11mm OSB, then install drip edge, roofing felt (underlay), and finally your chosen roofing material. Corrugated bitumen sheets (Onduline) are the fastest DIY roofing for small sheds; fibre cement or lightweight metal sheets last longest. Architectural shingles give the most house like appearance.
For wall cladding, T1 11 grooved plywood siding installs fast and provides structural bracing simultaneously. Traditional feather edge (bevel) boarding gives a more traditional appearance but takes longer to install. Treat all cut edges with wood preservative before installation, this single step doubles exterior timber lifespan.
🏡 Get Your Complete Shed Plans
Professionally designed shed plans with full cut lists, foundation options, and material quantities, every size from 6×4 to 16×20, with permit compliant designs.
Get Shed Plans Now →